Skip to content
Saleculator
Saleculator
  • Features
  • Downloads
  • Docs
  • Pricing
  • Blog
  • Partners
  • Contact

Installing Saleculator on Windows

HomeInstalling Saleculator on Windows

Get Support

Getting Started

  • Introduction
  • Installing Saleculator on Windows
  • Printer setup
  • Performing your first sale!
  • Basic POS Operations
  • Understand Saleculator User Interface
  • Keyboard Shortcuts
  • Building a low cost POS System with Raspberry Pi and Saleculator
  • Activating Saleculator
  • Building a Saleculator Point of Sale System (Linux)
  • Using MySQL for Saleculator
  • Saleculator Webin Introduction

What's New?!

  • Dynamic product labeling and more
  • Updates focusing multi-retail management
  • Introducing a whole new UI
  • Custom POS Reports and more
  • Cash counting while closing
  • Now Print, Email, or Save your reports with a single click! Check the latest update.

Saleculator Features

  • Different Billing Methods or Modes in Saleculator
  • Cash Closing in Saleculator
  • Close cash reports
  • Multiple outlet control from a single point
  • Bill settlement

Tutorials

  • Cashier Guide
  • Manager Guide
  • Administrator Guide

How To's

  • Happy hour sale
  • Edited bills report
  • Printing reports in thermal receipt printer
  • Assign product categories to user roles
  • Printing encoded product cost on label
  • Installing AnyDesk in Saleculator
  • Get quantity from price embedded barcodes
  • Print Open Items in Close Cash Report
  • Update cumulative stock balance in stock diary
  • Using Saleculator for subscription based billing
  • Automatic Billing On Events
  • Printing Expiry Date On Product Labels
  • Dynamic item pricing based on auxiliary item
  • Applying tax on an open item
  • VAT Update Resources for UAE and KSA
  • Apply discount on a selected item
  • Print total amount in words
  • GST Update for India
  • Setting offer to choose any 5 items for the price of 3
  • Buy One Get One Sale
  • Tag-Along items
  • Print accounts report on every 1st of month
  • Show stock of selected item or stop selling out of stock item
  • Change warehouse for current sale
  • Stock movement in close cash report
  • Configure second display with Saleculator
  • Allowing Saleculator to access gmail account for sending mails
  • Setting a shortcut on sales screen to call another screen
  • Updating Saleculator to the latest version
  • Assign dining tables to waiters
  • Payment report based on payment type
  • Dynamic printer or print format selection
  • Tax based on customer
  • Multiple taxes
  • Setting Printer.Ticket for 80 column pre-printed form
  • Get the credit card type
  • How to backup Saleculator data
  • Support for individual person billing sitting in the same table
  • Print Token/Sequence number in receipt & KOT
  • Print total amount in Arabic numerals
  • How to setup KOT Printing
  • How to use auxiliary product as item note or modifier
  • Calculate cash balance in the drawer
  • Printer item wise sales report in close cash report
  • Foreign currency support
  • Print last bill from sales screen
  • Automatically return to billing mode after KOT
  • Embedding Chrome browser in Saleculator POS
  • HO to Branch Sale
  • Print priority notification on KOT
  • Restrict KOT cancellation
  • Calculating quantity from amount
  • Price/Weight/Quantity embedded barcode configuration
  • Installing Saleculator Webin on Windows
  • How To Bulk load data using Saleculator Webin
  • Laundry Operations With Saleculator POS
  • Handling Customer Debts Using Saleculator Software
  • Assigning USB printer to LPT port in Windows
  • Using Saleculator for Salon Business
  • Setting Static IP for the Raspberry LAN connection
  • Reset Saleculator from Root Shell
  • How to setup receipt and KOT on the same printer
  • Adding Taxes to the bill receipt
  • Printing Receipt with KOT
  • How to print duplicate receipt copy
  • Remote access WEBIN and Putty
  • Deleting Products and Categories from Saleculator POS Menu
  • How to restore a backup from the raspberry root using a flash drive
  • Adding service charge button and resource
  • Adding Menu Search option on the sales screen
  • Printing receipts on A4 & A5 printer sheets
  • Adding shortcut buttons for Cash, Card and Debt payment modes
  • Downloading PLU file for Label Scale
  • Transaction cutting above certain amount limits
  • Retrieve The License Key from the Root
  • Protected: PIN Reset
  • Installing Saleculator on Android Tab/Phone
  • Manual Update of Date and Time from Raspberry root
  • Print Barcode Label using WEBIN
  • How to enable the buzzer sound (Beep) for your KOT printers
  • Create User Roles as per your needs and permissions (E.g, Create a Role for sending KOT only!)
  • Change product button size
  • Billing transaction for Advance payment customers
  • IMPORTANT! Close cash report changed in version 3.8 U2 onwards
  • Adding new reports in Close Cash report
  • Accepting advance payment
  • How to setup Saleculator Kitchen Display System – KDS
  • Automatic data backup
  • Delete transactional data older than given days
  • Customize product button font style
  • Payment report based on card service provider
  • Setting customer reward points
  • Printing discount amount/service charge below the total amount in the receipt
  • Updating Webin to the latest version
  • Category wise sales report with parent category and profit
  • How to print barcode labels from Saleculator
  • Print category wise sales report in Close Cash
  • Print receipt log in Close Cash report
  • Setting a default tariff for all new bills
  • Apply a discount or tariff based on customer category
  • Round Off the total bill amount
  • Discount on total bill amount
  • Printing a coupon along with the receipt
  • Capture additional information and store in receipt
  • Capture additional information about an item from sales screen
  • Setting product property
  • Adding ZATCA Approved QR code to the invoice
  • Adding a payment option for Tip collection
  • Print Arabic product names on the receipts
  • How to delete the pictures from all product buttons
  • How to add Onscreen Keyboard for Saleculator on Raspberry Pi
  • Adding UPI enabled Payment QR code on the Bill Receipt
  • Access Raspberry Root using only LAN cable and Putty App (Without Internet)
  • MySQL command to Update Tax to all the products on the catalog automatically
  • Connect your Raspberry to the WiFi network
  • How to setup KOT4 for additional printer
  • Setting Up the Server and Client (Windows)

Hardware Setup

  • Setting-up Network thermal printer
  • Connect a network thermal printer directly with Saleculator
  • Setup HP or Samsung Laser/Deskjet Printers
  • A4 Laser printer setup for reports
  • Using Bluetooth weighing scale with Saleculator on Raspberry Pi
  • Using Label Scale with Saleculator

Troubleshooting

  • Fixing Database Not Loading error in Saleculator M5
  • Fixing issue, which required double tapping on touch screen to get click working
  • Protecting Saleculator Database from Ransomware Attacks
  • Enabling Tapping To Click for touchpads
  • Installing WiFi adpaters
  • Enabling support for more than 4 serial devices
  • Switch screen mode from portrait to landscape
  • Running remote Saleculator in Windows using Putty
  • Recover data from ibdata and .frm files
  • Resources supporting 42 character printer
  • Disable Saleculator screen turning blank due to inactivity
  • Persistent names for usb and serial devices
  • A quick rescue to free space when mysql run out of space
  • Remove duplicate item entry in sales screen
  • Recover data from a crashed MySQL instance
  • Using Putty to remote access Saleculator command shell
  • Updating Saleculator SSL certificates manually in JAVA keystore
  • Fixing issue of CUPS pausing the printer
  • How to solve repeated activation key requests?
  • MySQL Warning: IP address ‘192.168.1.98’ could not be resolved: Name or service not known
  • How to fix if Saleculator is stuck on loading screen
  • Installing eGalax touchscreen driver on Linux
  • Saleculator stuck at command shell
  • Fixing “Not enough stock” error when billing products
  • How to fix no network connection issues while activating the license key
  • Delete transactions for heavy back-office data
  • Fixing “This product does not have attributes” error!
  • How to resolve “Danger: Cannot connect to database. Database not available” error on Windows
  • Corrupted/Damaged SD Card issues
  • Fixing Arabic language issue on the barcode label printout
  • How to reset the negative inventory unit values to zero
  • How to fix the disordered sequence of Ticket# in the sales log report
  • Fixing “mysqld.exe System Error” while installing MySQL on Windows
  • Fixing error “The entity name must immediately follow the ‘&’ in the entity reference.”
  • Fix issue of monitor turning blank while Saleculator loading
  • Solving common disk errors
  • Find tag ending issues in XML resources
  • Fixing “There is no stock of this item” error when trying to refund an item.
  • Data backup using command prompt (Windows)

Reference

  • Objects and Methods
  • Home
  • Documentation
  • Getting Started

Installing Saleculator on Windows

The following instructions are for installing Saleculator on Windows. You must have Java installed before installing Saleculator.

How can you confirm if Java is already installed?

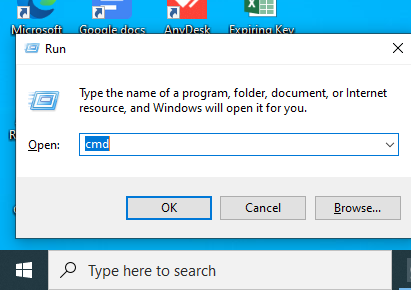
  1. Open the command prompt, by typing “cmd” in the bottom left search field, or by pressing the Windows key and “R“, which will open the Run command window, and type “cmd” in the given field and press enter.

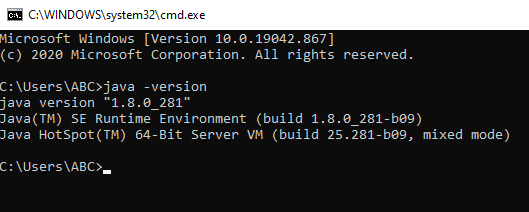
2. In the command prompt, type “java -version” and press enter. This will show you the version of Java that is running on your system. If Java is not installed on your system, you will see a command not recognized message. Please follow below steps if Java is not installed on your system.


Installing Java

  1. Click on this link https://java.com/en/download/ to download Java.
  2. On the Java website click on the red button that reads “Agree and start free download“.
  3. Once downloaded click on the bottom left download indicator

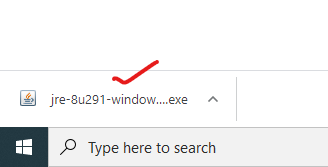
to run the file and click “Install” on the Java setup window. You will get a notification window once installed successfully. Close this window once done.

Watch how to install Java

Download, install and setup Saleculator

Watch how to install Saleculator
  1. Go to www.saleculator.com and click Download now. Open the Zip folder once it is downloaded. Copy all files and folders from the zip folder and move it to C: drive under the new folder “Saleculator”.
  2. Right click on saleculator.jar file and create a desktop shortcut. 
  3. Go to desktop, right click on Saleculator.jar icon and click properties. Under the shortcut tab click change icon click Browse and go to the saleculator folder under the C: drive. Click open the saleculator logo with the letter S and click ok again ok and close.
  4. Now open the Saleculator app from the desktop. You can click on the buy now button to purchase the complete product, or click on “Free trial” button for 30 days free trial. 
  5. Once you click the free trial button. It will lead you to a request trial screen where you have to fill in your details and click submit.
  6. You will receive the product serial key on your registered email. Copy paste the serial key and click Activate. Click on yes when you get a popup message asking to create database.

Congratulations you have successfully installed Saleculator!

In case you find difficult to activate Saleculator, please refer below document:
https://www.saleculator.com/documentation/activating-saleculator/

Start using Saleculator using the Basic Operations guide.
Refer For detailed usage instructions, please visit Saleculator Documentation.

Using MySQL for Saleculator

By default Saleculator use embedded Derby for storing data. But it is always recommented to use MySQL with Saleculator for performance and reliability.

Please refer below document for setting up MySQL for Saleculator.
https://www.saleculator.com/documentation/using-mysql-for-saleculator

Installing Saleculator on Linux

For installing Saleculator on Linux please refer below document:
https://www.saleculator.com/documentation/building-saleculator-pos-system/

Installing Saleculator on Raspberry Pi

For installing Saleculator on a Raspberry Pi, please refer below document:
https://www.saleculator.com/documentation/building-a-low-cost-pos-system-with-raspberry-pi-and-saleculator/

What are your Feelings
Share This Article :
  • Facebook
  • Twitter
  • LinkedIn
  • Pinterest
Still stuck? How can we help?

How can we help?

Updated on February 18, 2021
IntroductionPrinter setup
Saleculator

Primary Pages

  • Home
  • About
  • Contact
  • Service

Pages

  • About
  • Pricing
  • Contact
  • Request for Demo

Template

  • Blog
  • Service
  • Downloads
  • Contact

Copyright © 2022 | Saleculator