Skip to content
Saleculator
Saleculator
  • Features
  • Downloads
  • Docs
  • Pricing
  • Blog
  • Partners
  • Contact

Remote access WEBIN and Putty

HomeRemote access WEBIN and Putty

Get Support

Getting Started

  • Introduction
  • Installing Saleculator on Windows
  • Printer setup
  • Performing your first sale!
  • Basic POS Operations
  • Understand Saleculator User Interface
  • Keyboard Shortcuts
  • Building a low cost POS System with Raspberry Pi and Saleculator
  • Activating Saleculator
  • Building a Saleculator Point of Sale System (Linux)
  • Using MySQL for Saleculator
  • Saleculator Webin Introduction

What's New?!

  • Dynamic product labeling and more
  • Updates focusing multi-retail management
  • Introducing a whole new UI
  • Custom POS Reports and more
  • Cash counting while closing
  • Now Print, Email, or Save your reports with a single click! Check the latest update.

Saleculator Features

  • Different Billing Methods or Modes in Saleculator
  • Cash Closing in Saleculator
  • Close cash reports
  • Multiple outlet control from a single point
  • Bill settlement

Tutorials

  • Cashier Guide
  • Manager Guide
  • Administrator Guide

How To's

  • Happy hour sale
  • Edited bills report
  • Printing reports in thermal receipt printer
  • Assign product categories to user roles
  • Printing encoded product cost on label
  • Installing AnyDesk in Saleculator
  • Get quantity from price embedded barcodes
  • Print Open Items in Close Cash Report
  • Update cumulative stock balance in stock diary
  • Using Saleculator for subscription based billing
  • Automatic Billing On Events
  • Printing Expiry Date On Product Labels
  • Dynamic item pricing based on auxiliary item
  • Applying tax on an open item
  • VAT Update Resources for UAE and KSA
  • Apply discount on a selected item
  • Print total amount in words
  • GST Update for India
  • Setting offer to choose any 5 items for the price of 3
  • Buy One Get One Sale
  • Tag-Along items
  • Print accounts report on every 1st of month
  • Show stock of selected item or stop selling out of stock item
  • Change warehouse for current sale
  • Stock movement in close cash report
  • Configure second display with Saleculator
  • Allowing Saleculator to access gmail account for sending mails
  • Setting a shortcut on sales screen to call another screen
  • Updating Saleculator to the latest version
  • Assign dining tables to waiters
  • Payment report based on payment type
  • Dynamic printer or print format selection
  • Tax based on customer
  • Multiple taxes
  • Setting Printer.Ticket for 80 column pre-printed form
  • Get the credit card type
  • How to backup Saleculator data
  • Support for individual person billing sitting in the same table
  • Print Token/Sequence number in receipt & KOT
  • Print total amount in Arabic numerals
  • How to setup KOT Printing
  • How to use auxiliary product as item note or modifier
  • Calculate cash balance in the drawer
  • Printer item wise sales report in close cash report
  • Foreign currency support
  • Print last bill from sales screen
  • Automatically return to billing mode after KOT
  • Embedding Chrome browser in Saleculator POS
  • HO to Branch Sale
  • Print priority notification on KOT
  • Restrict KOT cancellation
  • Calculating quantity from amount
  • Price/Weight/Quantity embedded barcode configuration
  • Installing Saleculator Webin on Windows
  • How To Bulk load data using Saleculator Webin
  • Laundry Operations With Saleculator POS
  • Handling Customer Debts Using Saleculator Software
  • Assigning USB printer to LPT port in Windows
  • Using Saleculator for Salon Business
  • Setting Static IP for the Raspberry LAN connection
  • Reset Saleculator from Root Shell
  • How to setup receipt and KOT on the same printer
  • Adding Taxes to the bill receipt
  • Printing Receipt with KOT
  • How to print duplicate receipt copy
  • Remote access WEBIN and Putty
  • Deleting Products and Categories from Saleculator POS Menu
  • How to restore a backup from the raspberry root using a flash drive
  • Adding service charge button and resource
  • Adding Menu Search option on the sales screen
  • Printing receipts on A4 & A5 printer sheets
  • Adding shortcut buttons for Cash, Card and Debt payment modes
  • Downloading PLU file for Label Scale
  • Transaction cutting above certain amount limits
  • Retrieve The License Key from the Root
  • Protected: PIN Reset
  • Installing Saleculator on Android Tab/Phone
  • Manual Update of Date and Time from Raspberry root
  • Print Barcode Label using WEBIN
  • How to enable the buzzer sound (Beep) for your KOT printers
  • Create User Roles as per your needs and permissions (E.g, Create a Role for sending KOT only!)
  • Change product button size
  • Billing transaction for Advance payment customers
  • IMPORTANT! Close cash report changed in version 3.8 U2 onwards
  • Adding new reports in Close Cash report
  • Accepting advance payment
  • How to setup Saleculator Kitchen Display System – KDS
  • Automatic data backup
  • Delete transactional data older than given days
  • Customize product button font style
  • Payment report based on card service provider
  • Setting customer reward points
  • Printing discount amount/service charge below the total amount in the receipt
  • Updating Webin to the latest version
  • Category wise sales report with parent category and profit
  • How to print barcode labels from Saleculator
  • Print category wise sales report in Close Cash
  • Print receipt log in Close Cash report
  • Setting a default tariff for all new bills
  • Apply a discount or tariff based on customer category
  • Round Off the total bill amount
  • Discount on total bill amount
  • Printing a coupon along with the receipt
  • Capture additional information and store in receipt
  • Capture additional information about an item from sales screen
  • Setting product property
  • Adding ZATCA Approved QR code to the invoice
  • Adding a payment option for Tip collection
  • Print Arabic product names on the receipts
  • How to delete the pictures from all product buttons
  • How to add Onscreen Keyboard for Saleculator on Raspberry Pi
  • Adding UPI enabled Payment QR code on the Bill Receipt
  • Access Raspberry Root using only LAN cable and Putty App (Without Internet)
  • MySQL command to Update Tax to all the products on the catalog automatically
  • Connect your Raspberry to the WiFi network
  • How to setup KOT4 for additional printer
  • Setting Up the Server and Client (Windows)

Hardware Setup

  • Setting-up Network thermal printer
  • Connect a network thermal printer directly with Saleculator
  • Setup HP or Samsung Laser/Deskjet Printers
  • A4 Laser printer setup for reports
  • Using Bluetooth weighing scale with Saleculator on Raspberry Pi
  • Using Label Scale with Saleculator

Troubleshooting

  • Fixing Database Not Loading error in Saleculator M5
  • Fixing issue, which required double tapping on touch screen to get click working
  • Protecting Saleculator Database from Ransomware Attacks
  • Enabling Tapping To Click for touchpads
  • Installing WiFi adpaters
  • Enabling support for more than 4 serial devices
  • Switch screen mode from portrait to landscape
  • Running remote Saleculator in Windows using Putty
  • Recover data from ibdata and .frm files
  • Resources supporting 42 character printer
  • Disable Saleculator screen turning blank due to inactivity
  • Persistent names for usb and serial devices
  • A quick rescue to free space when mysql run out of space
  • Remove duplicate item entry in sales screen
  • Recover data from a crashed MySQL instance
  • Using Putty to remote access Saleculator command shell
  • Updating Saleculator SSL certificates manually in JAVA keystore
  • Fixing issue of CUPS pausing the printer
  • How to solve repeated activation key requests?
  • MySQL Warning: IP address ‘192.168.1.98’ could not be resolved: Name or service not known
  • How to fix if Saleculator is stuck on loading screen
  • Installing eGalax touchscreen driver on Linux
  • Saleculator stuck at command shell
  • Fixing “Not enough stock” error when billing products
  • How to fix no network connection issues while activating the license key
  • Delete transactions for heavy back-office data
  • Fixing “This product does not have attributes” error!
  • How to resolve “Danger: Cannot connect to database. Database not available” error on Windows
  • Corrupted/Damaged SD Card issues
  • Fixing Arabic language issue on the barcode label printout
  • How to reset the negative inventory unit values to zero
  • How to fix the disordered sequence of Ticket# in the sales log report
  • Fixing “mysqld.exe System Error” while installing MySQL on Windows
  • Fixing error “The entity name must immediately follow the ‘&’ in the entity reference.”
  • Fix issue of monitor turning blank while Saleculator loading
  • Solving common disk errors
  • Find tag ending issues in XML resources
  • Fixing “There is no stock of this item” error when trying to refund an item.
  • Data backup using command prompt (Windows)

Reference

  • Objects and Methods
  • Home
  • Documentation
  • How To's

Remote access WEBIN and Putty

This document will guide you on how to access your WEBIN or Raspberry root shell (Using Putty) from a remote device outside the LAN


Procedure:

Enabling Port-Forwarding in Router

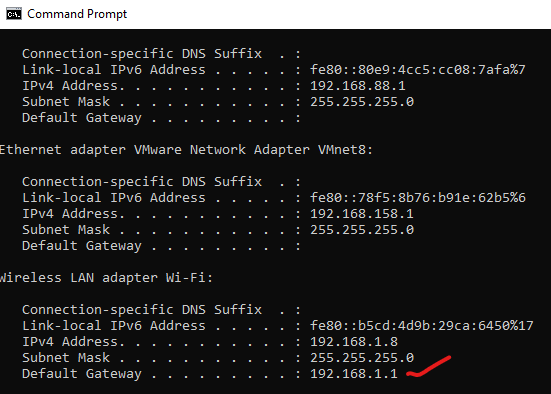
1. Open the browser and type the gateway IP address of your router in the address bar and hit enter
(In my case it is 192.168.1.1 you can find the gateway IP for the router by typing ipconfig in the command prompt)

2. Enter the username and password on the Gateway login screen (Default username and password is admin in most cases)

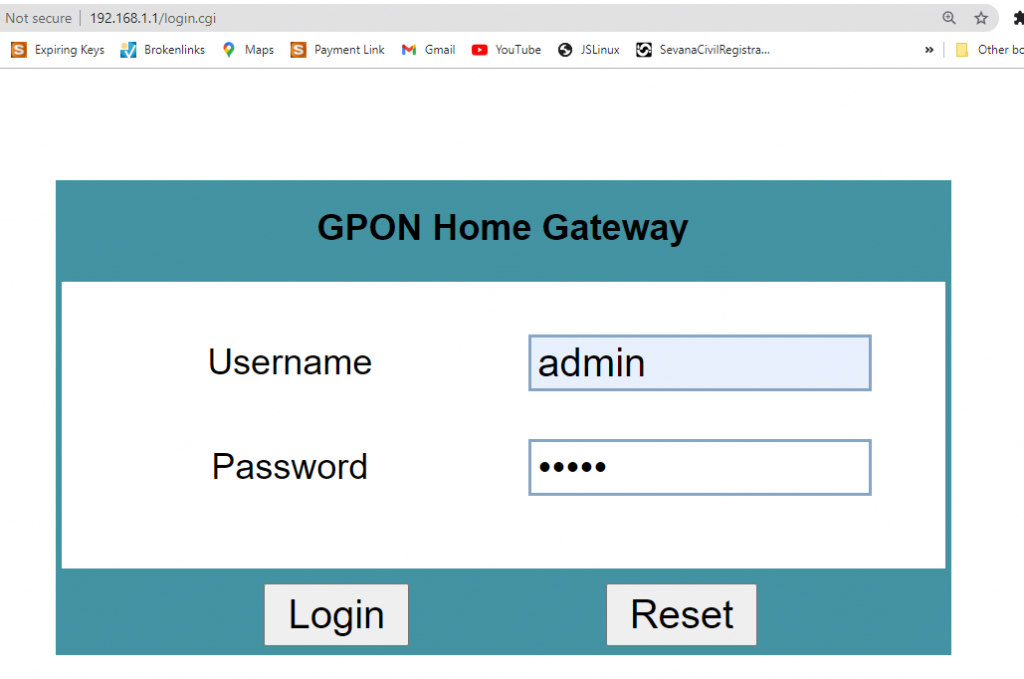
3. Click on Login, once inside search for the Port Forwarding option under the available titles. In my case, it is located under “Application“

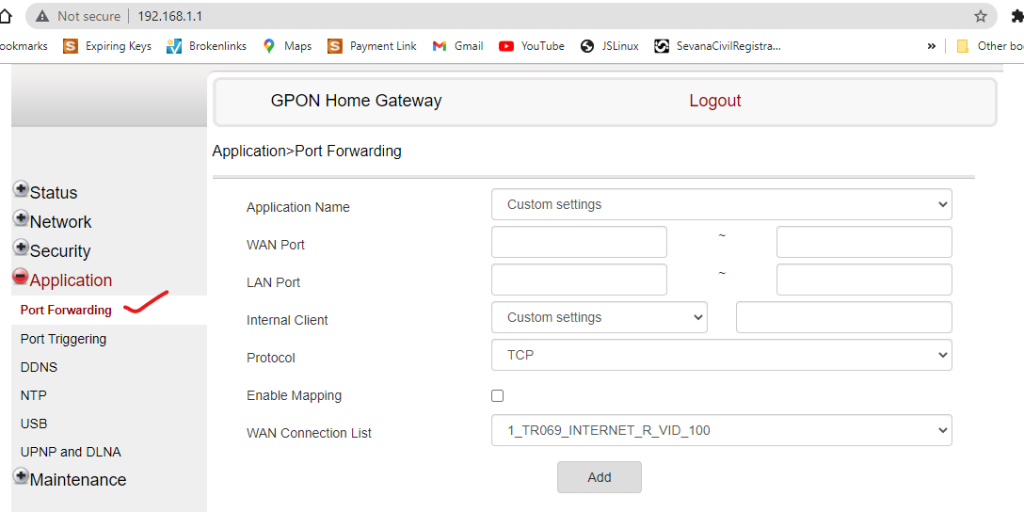
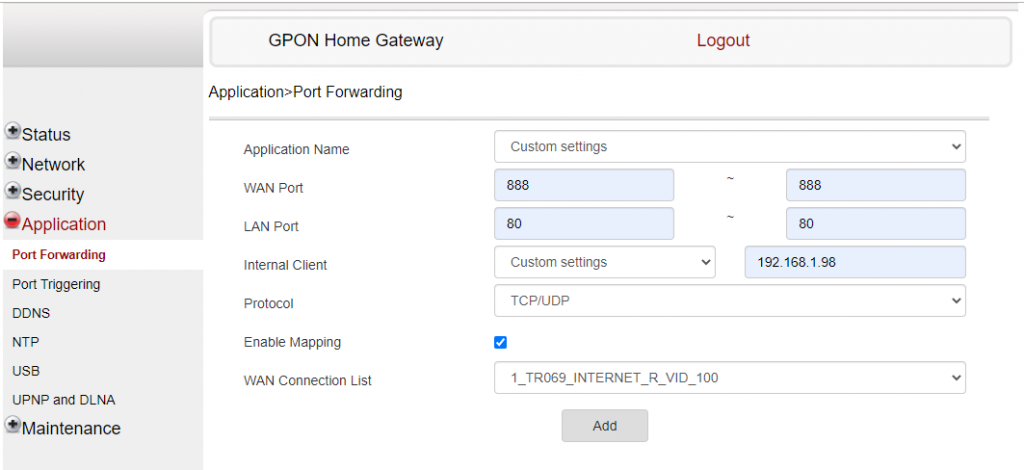
4. Fill in the details as mentioned below:

Application Name: Skip this (Leave the default selection)
WAN Port: 888 ~ 888
LAN Port: 80 ~ 80
Internal Client: IP Address of your device (Raspberry Pi, Windows, Linux)

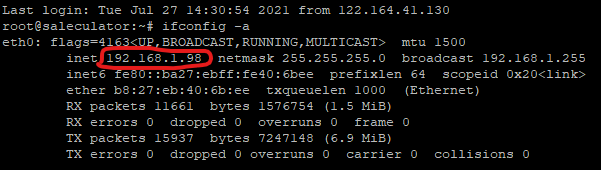
To find the IP address for Raspberry press CTRL+ALT+F1 login
to root (User name is root and password saleculator) and type
ifconfig -a and press enter.

Protocol: TCP/UDP
Enable Mapping: Select this (Optional)
WAN Connection List: Skip this (Leave the default selection)

Click on the Add button

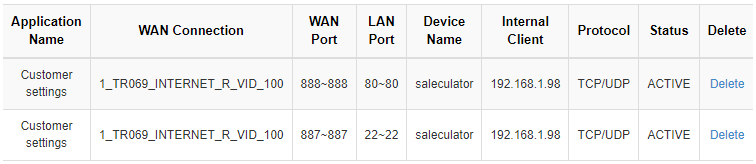
5. Once added the status will be displayed at the bottom. Like mentioned in the image below

6. Repeat step 4 to enable port forwarding for putty as well
(The only difference this time will be the WAN Port 887 and LAN Port 22, rest all the steps will remain the same)

7. Once both ports are enabled the status will be displayed at the bottom. Like mentioned in the image below

8. Logout of the Gateway Screen


Creating hostname and assigning the device IP address under the hostname

1. Got to noip.com

2. Under Create Your Free Hostname Now fill in the details as below
Hostname: Name of your choice (Device name, company name, etc.,
In my case posics)
From the dropdown: Choose an extension available (In may case .hopto.org)

3. Enter your valid email, password, and hostname details on the next page and click the Free Sign Up button at the bottom.

4. Once your account is activated on noip web portal, log in using your credentials

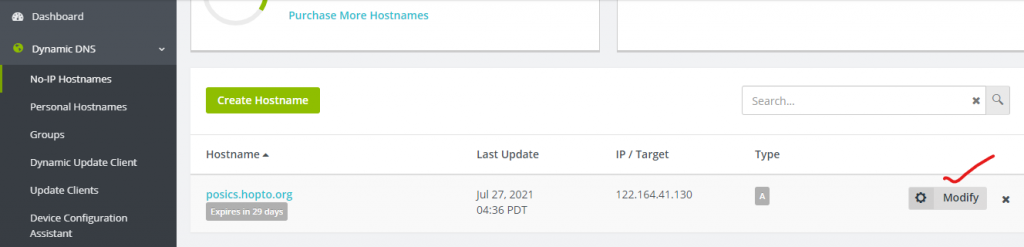
5. Once you are on the dashboard click on the Dynamic DNS button on the left side list. This will show the hostname created. Click on the Modify button.

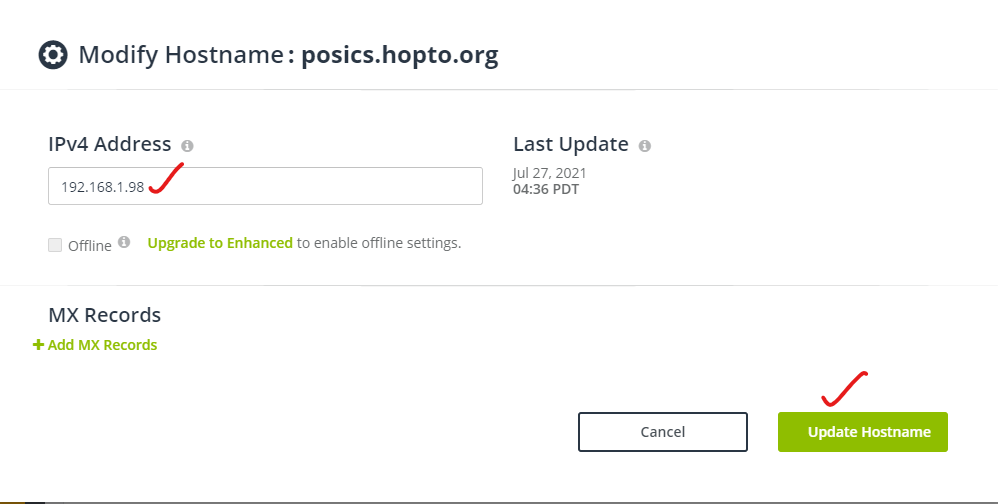
6. On the Modify Hostname window update your device IP address (192.168.1.98 my case) on the IP address field and click on Update Hostname button.

7. Once done Logout of noip portal

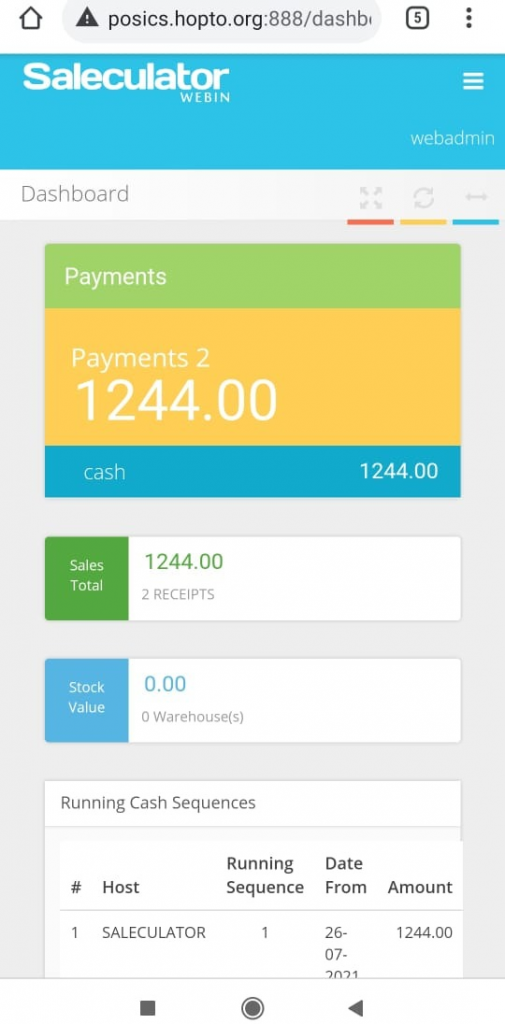
Accessing WEBIN from a remote device

To access your WEBIN from a remote device outside your LAN,
Open the browser of your device, in the address bar type as mentioned below:

Your created hostname followed by the port number separated by :
E.g., posics.hopto.org:888

9. Press go/enter on your browser after entering the above address

10. This will open the Saleculator WEBIN page on your device (Mobile, Laptop, etc.,) as shown in the image below


Accessing Root shell from the Putty on a remote device

1. Open Putty on your Laptop/Desktop

2. Under the hostname type the created hostname instead of the IP address and Port should be 887

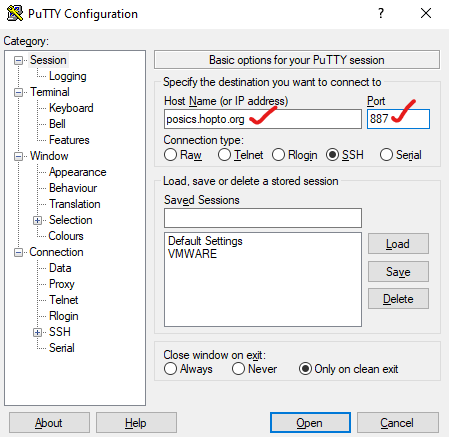
3. Press Open and you can access the remote root shell from your device as shown below

What are your Feelings
Share This Article :
  • Facebook
  • Twitter
  • LinkedIn
  • Pinterest
Still stuck? How can we help?

How can we help?

Updated on July 27, 2021
How to print duplicate receipt copyDeleting Products and Categories from Saleculator POS Menu
Saleculator

Primary Pages

  • Home
  • About
  • Contact
  • Service

Pages

  • About
  • Pricing
  • Contact
  • Request for Demo

Template

  • Blog
  • Service
  • Downloads
  • Contact

Copyright © 2022 | Saleculator